Flute cleaning kits and the daily routine
Flute pads fail from trapped moisture more than anything else, and the routine that prevents it takes thirty seconds.
By Stephen V. · Writes Reed & Rosin · last verified
The short answer
Swab the flute after every session using the cleaning rod and a gauze cloth, drawing it through each of the three joints. Never store the swab inside the instrument — that traps moisture against the pads, which is exactly what causes them to fail.
Some links on this page earn us a commission at no extra cost to you. It does not change which instrument we recommend, and it does not change the order. We also earn nothing when the honest answer is “rent it” — and we still say so. Full disclosure.
Quick picks
| # | Product | Best for | Score | Price |
|---|---|---|---|---|
| 1 |  Yamaha Flute Maintenance Kit Cleaning cloth, cleaning rod and polishing cloth in one package. Flute pads fail from trapped moisture more than anything else, and swabbing after every session is the whole preventive routine. | The routine that keeps pads alive | 8.7/10 | $20.94View on Amazon #ad · price as of September 7, 2026 · how this is funded |
| 2 | 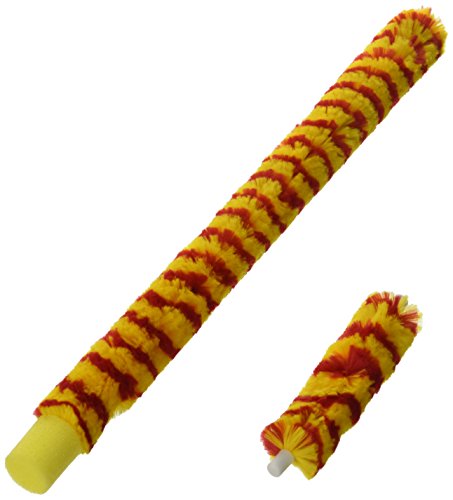 HW Products Flute Pad-Saver Set A fluffy insert that pulls moisture out of the bore in one pass, and a child will actually use it because it takes three seconds. Do not store it inside the flute between sessions. | A swabbing routine a child will keep | 8.4/10 | $16.98View on Amazon #ad · price as of September 7, 2026 · how this is funded |
Scores are our own editorial fit rating from published specifications — the rubric is on our methodology page. They are not test results; we have not played these instruments.
Why this is the most valuable habit on the instrument
The flute has almost no running costs and one significant repair risk: pads. A full repad on a student flute frequently costs more than the instrument is worth, and the dominant cause of early pad failure is moisture sitting inside the bore after playing.
Thirty seconds of swabbing after each session removes that moisture. It is the highest-return maintenance routine covered anywhere on this site, and it is the one most consistently skipped by students in a hurry to get to lunch.
What belongs in a flute cleaning kit
| Item | What it does | Essential? |
|---|---|---|
| Cleaning rod | A slim rod with a slot at one end; a cloth threads through it and is drawn through the bore | Yes — usually supplied with the flute |
| Gauze or lint-free cloth | Threads through the rod to absorb moisture | Yes |
| Polishing cloth | Removes fingerprints from the outside, which are acidic and mark the plating | Yes |
| Pad-drying paper | Blotting paper placed under a sticky key to draw moisture out | Very useful — the fix for a key that clicks or sticks |
| Insert swab (pad saver) | A fluffy insert pushed through the bore for a quick dry | Optional, and see the warning below |
| Tuning-rod alignment mark | The line at the end of the cleaning rod checks the headjoint cork position | Comes on the rod; worth knowing what it is for |
The after-playing routine
- 1
Take the flute apart into its three joints
Headjoint, body, foot. Twist rather than pull, and hold the joints rather than the keys — gripping the keywork is how rods get bent.
- 2
Thread the cloth through the cleaning rod
Push a corner of the gauze through the slot, then wrap the rest of the cloth around the rod so no bare metal is exposed. Exposed metal scratches the inside of the bore.
- 3
Draw it through each joint
Push the wrapped rod through the body and the foot, and into the headjoint as far as the cork. Twist gently as you go. Two passes per joint is plenty.
- 4
Wipe the outside with the polishing cloth
Fingerprints are acidic and etch silver plating over time. Ten seconds prevents a cosmetic problem that cannot be undone.
- 5
Put it away with the joints separated
In the case, in the molded recesses. Do not leave a swab inside any joint.
Never store a pad saver inside the flute
Insert swabs are convenient and there is a genuine trap: leaving one inside the instrument between sessions holds the absorbed moisture against the pads for hours, which is precisely the opposite of what the swab is for.
Use it, then take it out and let it dry outside the case. A pad saver stored inside a flute causes the pad failure it was bought to prevent, and this is a genuinely common mistake.
The sticky key fix
A key that clicks, sticks or releases with an audible smack usually has moisture trapped between the pad and its tone hole. It is not a fault and it does not need a repair.
- Slide a sheet of pad-drying paper under the pad.
- Press the key gently a few times — gently, because pressing hard can tear the pad skin.
- Draw the paper out while the key is closed, then repeat once or twice.
Do not use ordinary paper towel or banknotes, both of which are common improvisations. Paper towel leaves lint on the pad and banknotes are coated in a way that can leave residue.
What needs a technician
Anything involving the keywork. A bent rod, a key that no longer returns, a pad that has visibly torn, or a persistent leak after swabbing are all shop jobs. Attempting to bend keywork back by hand almost always makes the alignment worse, and alignment is what decides whether the pads seal.
The headjoint cork position is also worth a mention: the mark on the cleaning rod should sit in the center of the embouchure hole when the rod is inserted into the headjoint. If it does not, the cork has moved and the flute’s intonation across the range is off. A technician resets it in minutes.
The picks, in full
Every card below is written from the published specification and the manufacturer’s own documentation. We have not played these instruments — see how we work for exactly what that means and what we do instead.
Our top pick · The routine that keeps pads alive
Yamaha Flute Maintenance Kit
Cleaning cloth, cleaning rod and polishing cloth in one package. Flute pads fail from trapped moisture more than anything else, and swabbing after every session is the whole preventive routine.
What works
- Everything for the after-playing routine in one purchase
- The gauze cloth is lint-free, unlike a household cloth
What to know
- Contents are basic; a dedicated pad-drying paper is still worth adding
- Contents
- Cleaning cloth, cleaning rod, polishing cloth
- For
- Flute
#ad · price as of September 7, 2026 · how this is funded
Specs read from the manufacturer or retailer listing on 2026-09-07. Our fit score: 8.7/10.
Pick 2 · A swabbing routine a child will keep
HW Products Flute Pad-Saver Set
A fluffy insert that pulls moisture out of the bore in one pass, and a child will actually use it because it takes three seconds. Do not store it inside the flute between sessions.
What works
- Faster than threading a cloth through a rod, so it actually gets used
- Reaches the headjoint, body and foot separately
What to know
- Leaving it inside the flute traps moisture against the pads — the opposite of the point
- Needs washing periodically or it becomes the dirt source
- Type
- Insert swab set
- For
- Flute (head, body, foot)
#ad · price as of September 7, 2026 · how this is funded
Specs read from the manufacturer or retailer listing on 2026-09-07. Our fit score: 8.4/10.
Questions people actually ask
How do you clean a flute after playing?
Take it apart into its three joints, thread a gauze cloth through the cleaning rod so no bare metal is exposed, and draw it through each joint twice. Then wipe the outside with a polishing cloth and put it away with the joints separated.
Should I leave the pad saver inside my flute?
No, and this is a common and damaging mistake. A swab left inside holds absorbed moisture against the pads for hours, causing exactly the pad failure it was bought to prevent. Use it, remove it, and let it dry outside the case.
Why is my flute key sticking?
Almost always moisture trapped between the pad and its tone hole. Slide pad-drying paper under the pad, press the key gently a few times, and draw the paper out while the key is closed. Avoid paper towel, which leaves lint.
How often should a flute be cleaned?
Swab it after every session — that is the whole routine and it takes thirty seconds. A professional service every year or two checks pad seating and key alignment, which is not something a player can assess at home.
Sources
We have not played these instruments, so citation is our evidence. Everything above traces back to one of these, on the date shown.